Hey guys!
Today I am sharing a video of an Art Journal page I had created for my last blog post. If you are an aspiring artist who wants to try your hand at collaging and mixed media, this video is for you! You can watch every step along the way as this dreamy girl's page comes alive with colors. Enjoy!

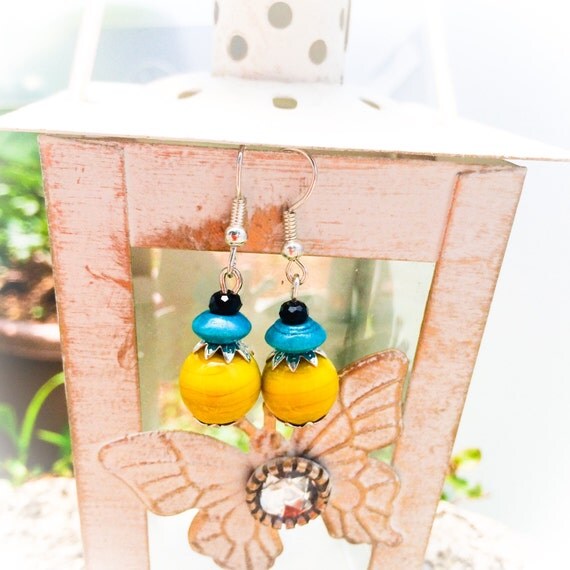
Jewelry Making Basics #4: Making a Simple Pair of Dangle Earrings (Free Tutorial)
So you want to make your own jewelry?
I hear that! And that's why I put together the Jewelry Making Basics series so can you start off by making yourself a cute little pair of dangle earrings. Guess what, we are at #4, the last in this Basics series. If you haven't yet visited the previous parts, here there are, packed with information and useful links:
Part 1: All About Beads
Part 2: Jewelry Making Findings/Parts
Part 3: All About Tools
Ok, so let's jump right in.
The Ingredients
This is my selection of beads. I picked 2 different sizes of round beads and one sparkly disk bead (or Rondelle) for each set.
Here are the findings I use: Fish Hooks, Bead Caps, Head Pins.

Ok, now for the tools (from left to right): Flat Nose Pliers, Round Nose Pliers, Wire Nippers. Keep it simple!

The Creation
This is what my simple creation looks like. Yay!

The Video
I have put the steps together in a simple video, (it's easy!) so check it out:
A Giveaway!
So now it's your turn! Post a picture of your creation in the comments below and win 20% off my jewelry collection on my Etsy store. (Each person who post a picture get's one coupon. Offer valid till this blogpost is alive!) Your creation can be simple, fancy or OOAK!
And that's it for now! Hope you liked this series - send me a comment! And don't forget to Subscribe to this blog. Have a great week and I will see you soon!
#etsy #etsyjapan #crafts #crafting #handmade #handmadeology #craftshows #sell #crafty #smallbusiness #branding #brand #sales #creative
#localbusiness #businesscard #jewellery #business
#how to
Jewelry Making Basics #3: All About Tools (Free Tutorial)
Hi everyone!
Today I'll cover part #3 of my Jewelry Making Basics series, and this will be all about Jewery Making Tools, literally, the most vital entities in our jewelry making endeavours!
I hope you got to read my two earlier posts Jewelry Making Basics #1: All About Beads and Jewelry Making Basics #2: Jewelry Findings/Parts. If not, you can just click on these links and catch up on all that you missed! Also, don't forget to don't forget to Subscribe to this blog so you don't miss a post!
Ok, so let's dive in.
Tools, Tools, Tools
When I first started making jewelry, the very first tool I invested in was a pair of Round Nose Pliers. Although it lost its precision over the years, I still have it! It's rusted too, but I'll share the image anyway. Here we go..well used and well loved!
These pliers are rounded and tapered from thick to thin. What are they used for? Basically for bending a wire or a head pin into a loop. The tapering nose allows for creating loops of differing sizes (diameters) by holding them at the appropriate position along the length of the nose. (that sounds funny)
The other tool that I rely on heavily is this pair of Wire Nippers. Once my loop is created, I use it to cut off the extra wire or head pin.

If there are only two tools that you can afford or care to invest in, it's got to be these two! In fact, for the longest period of time, these were the only two tools I possessed!
Later, I invested in Flat Nose Pliers. What do I use them for? For straightening bent wires and for creating 90 degree angles. As you can see (below), mine are serrated on the inside and the serrations provide a little more grip on the wire. But they could also scratch the surface (especially if it is coated), so you need to be careful. I often use a piece of felt in between to prevent scratching. I bet there is a better tool out there to take care of this precise need but we will try to stay simple for now.

As you learn the ropes and get advanced in your skill, you will become cognizant of the fact that there are a TON of tools out there in the market made by various makers, each performing a very precise function in the jewely making process. Some boast grip, others tout the angles or precision. Here is a great resource by Fire Mountain Gems and Beads, explaining some of the commonly used jewelry making tools. That's about 20 different tools right there!
In this short video I cover three simple skills using three Jewelry Making Tools:
Where to Buy Jewelry Making Tools
If you are just testing the waters and not a 100% sure that you will stick to your jewelry making hobby, you could visit a dollar store or a ¥100 shop to pick up some starter tools, but I can tell you from experience that these items will not last too long (sadly). But if you are looking at jewelry making as a long term hobby, it might be a good idea to invest in some of the sturdier and good quality brands such as Wubbers or Lindstorm.
My favourite place for tools shopping in Tokyo would be Tokyu Hands. Bead and supplies stores such as Kiwa and Parts Club will also carry a handy collection of tools. But there are a ton of online options as well, including Amazon.
Another great option would be to purchase online from Etsy, the global handmade marketplace. Here is a list of some suppliers on Etsy that sell high quality brands internationally from the US, and UK. Many of them offer related jewelry making supplies as well, so definitely check them out in case you want to combine a shipping order and bring down the price. Here we go:
Ok, we're nearing the end. Next time, we are going to actually make a pair of dangling earrings using a basic set of Beads, Findings and Tools. Remember, we are trying to be able to make something simple like this pair of danglers.

So get your materials together and get ready for next time. That's it for now! Don't forget to Subscribe to this blog and keep coming back for more!
So get your materials together and get ready for next time. That's it for now! Don't forget to Subscribe to this blog and keep coming back for more!
[P.S. I would love to see your comments or any questions you might have. Will try to answer them to the best of my ability and knowledge! Ok, this is the last thing I'm going to say. Cheers! Have a great week!]
#etsy #etsyjapan #crafts #crafting #handmade #handmadeology #craftshows #sell #crafty #smallbusiness #branding #brand #sales #creative
#localbusiness #businesscard #jewellery #business
#how to
Jewelry Making Basics #2 : Jewelry Findings/Parts (Free Tutorial)
Hi everyone!
So, I hope you got to read my earlier post Jewelry Making Basics #1: All About Beads. And if you didn't, you can just click on the link above and catch up on all that you missed about Beads Basics. Also, don't forget to don't forget to Subscribe to this blog so you don't miss a post!
This is part 2 of my Jewelry Making Basics. In this post I am covering the basics of Findings and Parts, so let's jump right in!
Types of Jewelry Findings
In jewelry making terms, "Findings" are parts that link beads together. These include earring hooks, jump rings, crimps, clasps, spacers, bead caps and more. Here is a great resource put out by Joann, the craft store. It gives you a visual description of all the types that are out there.Of, course, if you want to restrict your jewelry making hobby to a small scale, you will only need a few of these types. For example, in these simple dangle earrings I made, I only used Fish Hooks and Head Pins.

Here is a visual of some of the findings that I reach for the most: Fish Hooks (for earrings), Head Pins, Jump Rings, Clasps (for necklaces, bracelets and anklets.)
.JPG)
And of course, I could not do without mentioning these babies: Spacers, Bead caps and Filigree. Are you beginning to see where and how these might be used? If not, don't worry, coz you will see their place very soon when you put together your own piece of jewelry.

Jewelry Findings Materials
Earring findings are typically made of Silver Plated Metals, 925 Silver, 14K Gold, Titanium, Brass to name a few. Here is a great resource that talks about metals and alloys that are safe to use in jewelry making. Of course, if you buy your Findings (or Parts as they are called in Japan) from a regular craft store, you will not need to mess with learning about these different metals. What is useful to know though, is that there are some types of metals that will not cause allergies. Here is a great resource about buying the right type of metal if you have allergies or if you are making a pair for someone who does (very important!)
Findings in Typical Colors
Basically, if you want to go crazy, you can buy findings in any color you like - Orange? I'm sure you will find them somewhere on Google. I like to be a little crazy but not too much! In my stash of metallic findings I have Gold, Silver, Copper, Brass, Black, Patina Pink (also called Pink Gold or Rose Gold). Recently I have also seen White Gold in jewelry stores.
The thing to remember while picking a color is that all of your findings in a single jewelry piece will need to be the same color or closest match (seems obvious but I've often made the mistake of not stocking up on complimentary pieces). For example, if you are investing in black Fish Hooks, make sure you also pick up other coordinating parts like Pin Heads, Jump Rings or Clasps in the same color and preferably from the same maker. You may not be too picky right now, but as you develop your skills and a keen eye, you will realize that even within black there are MANY shades and textures!!
The thing to remember while picking a color is that all of your findings in a single jewelry piece will need to be the same color or closest match (seems obvious but I've often made the mistake of not stocking up on complimentary pieces). For example, if you are investing in black Fish Hooks, make sure you also pick up other coordinating parts like Pin Heads, Jump Rings or Clasps in the same color and preferably from the same maker. You may not be too picky right now, but as you develop your skills and a keen eye, you will realize that even within black there are MANY shades and textures!!
.JPG)
Where to Buy Findings
If you are visiting/living in Tokyo or other parts of Japan the staple stores for Findings (that also have an online presence if you can read Japanese) are Kiwa, Parts Club and Tokyu Hands. If you don't have access to Japanese help, it's best to visit directly. Kiwa and Parts Club do have outlets in Asakusabashi and you can find Tokyo Hands in Shibuya or Shinjuku.
The other option would be to purchase online from Etsy, the global handmade marketplace. Here is a list of some sellers on Etsy that sell high quality, unique and interesting findings from the US, UK, Canada and Germany. Many of them have Discount Coupon Codes and Sales that you could take advantage of, so check them out:
2. FunkelShop
4. dmsupply
5. SoloSupplies
Ok, that's it for now. Next time, we will cover jewerly making tools. Don't forget to subscribe and keep coming back to check for more!
Oh, and if you would like a discount on any of the jewelry I make, use the coupon code BLOGOFF in my Etsy store themagicofbeads (valid only for a limited time). See you next time!
[P.S. Please leave a comment and let me know if this was useful! Bye!]
#etsy #etsyjapan #crafts #crafting #handmade #handmadeology #craftshows #sell #crafty #smallbusiness #branding #brand #sales #creative
#localbusiness #businesscard #jewellery #business
#how to
Jewelry Making Basics #1 : All About Beads (Free Tutorial)
Would you like to be able to make your own jewelry but want to keep it to a small scale, without having to spend a TON of money or time? Something simple, maybe like these Bohemian inspired summer danglers? Then read on..
Ok! So I am starting a new series called Jewelry Making Basics, where I will be sharing with you entry level skills for bead jewelry making along with information about where to find materials if you are living in Tokyo/Japan, as well as online resources from where you can easily have materials mailed right to you post box.
So please leave a comment on this post below, and don't forget to Subscribe to this blog for automatic updates via email.
For the first post I am going to share some resources about different types of beads that exist out there. You can also Google and find out more, but this post could be your starting point.

Here's a great resource that talks about bead sizes: http://bit.ly/1lvtfWG. There is also this wikipedia article on bead sizes.

Japan and India are famous for fresh water pearls. India and China take the lead in the gemstones market.
Beads found in India include those imported from China as well as a lot of natural gems and stones from all parts of the country, and what I like best about shopping in India is that they are so affordable, though you do have to take the help of locals to find where all the wholesale action is. Be prepared to have to ask for a specific type or color of beads because not everything is displayed at eye level. The shopkeeper will typically have someone bring out a box from the back of his shop to "show you". Then you decide on the amount you want, it will be weighed and given to you in a small bag on the spot. I also found this online shopping guide for glass bead dealers in India.
Buying beads in Japan is like shopping in paradise. Everything is visually displayed, neatly and beautifully packed (which might not be a great thing environmentally, but ya, you can find exactly what you need).
The bead mecca of Tokyo is located in the Asakusabashi and Okachimachi areas. Asakusabashi is pretty friendly to hobbyists but Okachimachi is mainly for retail and wholesale and a while ago when I went into a shop there, I was asked for my business card to even enter. (!!) Back then, I had not established my business so I had to satisfy myself with window shopping!
Shops that carry a large collection of beads that I like to shop at are: Joyful Honda, Tokyu Hands, Parts Club, Kiwa, Yuzawaya to name a few. Some of them have online stores as well, so check them out.
I am also sharing a list of some of my favourite Jewelry sellers on Etsy Japan. Check them out!
1. Kojica
2. OfOnAWhim
3. Aya1Gou
4. CapriciousBijoux
5. HoriSweetShop
6. Pemabeads
Ok, that's it for now. Next time, I plan to cover Jewelry Findings. Don't forget to subscribe to this blog, and do leave a comment below about what you think about this series!
Have a fantastic week!
So please leave a comment on this post below, and don't forget to Subscribe to this blog for automatic updates via email.
For the first post I am going to share some resources about different types of beads that exist out there. You can also Google and find out more, but this post could be your starting point.
Bead shapes
My favourite bead shapes are round, square, rondelles and bicones. But there are a variety of different shapes that creative peeps have come up with. Here is a great resource on bead shapes http://bit.ly/SWDzMK. I could count at least 40 and I am pretty sure there are more!!!Bead Sizes
Beads sizes are measured in "aughts". Typical sizes are 6, 8, 11, 15. The larger the size, the smaller the bead. To make my wire wrapped jewelry, I typically use a mix of sizes 11 and 6.Here's a great resource that talks about bead sizes: http://bit.ly/1lvtfWG. There is also this wikipedia article on bead sizes.
Bead Types
There are several. Seed beads, Lampwork beads, Fresh Water Pearls, Power-Stone beads, Gemstone beads, Metallic beads just to name just a few. There is a great board I found on Pinterest that can show you all the amazing possibilities with bead types.Bead Exporting countries
Some countries famous for their glass beads are: China, Austria, Czech Republic, Japan and India. Here is a statistical map of exports from various countries: http://bit.ly/1hURRceJapan and India are famous for fresh water pearls. India and China take the lead in the gemstones market.
Jewelry Supplies Shops
I typically buy my beads and other jewelry materials from the US, India and Japan. I know that what I buy in the US would include a mix of imported beads coming in from other countries, but I like the choice, range and quality control. My favourite bead store in the US is Shipwreck Beads. I call it the COSTCO of beads! And I think they also offer international shipping. I also visit Michaels, Joann all the time, especially around SALE time ;)Beads found in India include those imported from China as well as a lot of natural gems and stones from all parts of the country, and what I like best about shopping in India is that they are so affordable, though you do have to take the help of locals to find where all the wholesale action is. Be prepared to have to ask for a specific type or color of beads because not everything is displayed at eye level. The shopkeeper will typically have someone bring out a box from the back of his shop to "show you". Then you decide on the amount you want, it will be weighed and given to you in a small bag on the spot. I also found this online shopping guide for glass bead dealers in India.
Buying beads in Japan is like shopping in paradise. Everything is visually displayed, neatly and beautifully packed (which might not be a great thing environmentally, but ya, you can find exactly what you need).
The bead mecca of Tokyo is located in the Asakusabashi and Okachimachi areas. Asakusabashi is pretty friendly to hobbyists but Okachimachi is mainly for retail and wholesale and a while ago when I went into a shop there, I was asked for my business card to even enter. (!!) Back then, I had not established my business so I had to satisfy myself with window shopping!
Shops that carry a large collection of beads that I like to shop at are: Joyful Honda, Tokyu Hands, Parts Club, Kiwa, Yuzawaya to name a few. Some of them have online stores as well, so check them out.
Online Jewelry Stores in Japan
While there are a ton of Japanese stores that have an online presence, I'd like to introduce Etsy to you, if you did not already know. Etsy is an online marketplace for handmade items, supplies and antiques. At the time of writing this post, Etsy has about a million sellers and about 30 million buyers worldwide.
As some of you know, I run my own jewelry store on Etsy called TheMagicOfBeads. Currently I am offering a 10% discount on my Etsy store here for anyone interested in buying ready made jewelry. Please use the discount coupon code: BLOGOFF to claim your discount. [Note that this discount code will only work on my store: TheMagicofBeads and not the whole of Etsy!]
I am also sharing a list of some of my favourite Jewelry sellers on Etsy Japan. Check them out!
2. OfOnAWhim
3. Aya1Gou
4. CapriciousBijoux
5. HoriSweetShop
6. Pemabeads
Ok, that's it for now. Next time, I plan to cover Jewelry Findings. Don't forget to subscribe to this blog, and do leave a comment below about what you think about this series!
Have a fantastic week!
#etsy #etsyjapan #crafts #crafting #handmade #handmadeology #craftshows #sell #crafty #smallbusiness #branding #brand #sales #creative
#localbusiness #businesscard #jewellery #business
#how to
Visit to #DesignFesta

May 18th, 2014, the day I had been waiting for! A colleague of mine who had visited the International Art Festival #DesignFesta last year told me about it (knowing about my artsy inclinations) so this year I just had to go.

My day started off taking the early train to Big Sight, one of Tokyo's largest exhibition halls. You can tell from the crowds in the picture above that this is certainly a popular spot for young people.

At 11:00, just before the opening, I could see the crowds building up. I had heard that it takes 2 hours to stand in the queue to just buy the tickets so I bought mine ahead of time at Family Mart! Hee hee.
There was so much to see and so many creative people to interact with. I cannot possibly contain all my encounters into one blog post so I will show case just a few that I absolutely loved. The first one that stands out in my mind is this creative LED lamp made with resin mushrooms. How cute are they! The shop was called Great Mushrooming and by the time I reached almost all their items had a SOLD stamp on them. And believe me, they were certainly not cheap! This is their website.
Another growing trend that I saw in several stalls was the creative use of 3D printed items. Look at these #kawaii #3D printed houses that are propped up as wall decorations.

And then there were the miniature jewelry stalls. These pieces are hand woven and then made into jewelry. They are so tiny you can hardly see them. Only a true Japanese (or someone who has lived here long enough) can appreciate all things miniature! Since I wanted to capture the ambience of the shop I did not get a good close up to show you but I am linking this lovely lady's stall here.


And this next stall was run by a very lovely lady who "weaves" all kinds of useful items like tiny coin purses and paper files/catchers that can go inside your handbag and nicely contain A4 size papers folded twice. The material she uses is kraft paper! I have tried weaving with craft paper myself and believe me, my fingers remembered the painfor days. She must be pretty good at it because she said she could complete her largest piece in about 2 hours! Unfortunately I don't have a link to share.

Now this next shop, I found interesting primarily because of her use of whimsical creatures that I have only seen in American/Western Whimsical art like this.

Last but not the least was the miniature Doll houses - a craze in Japan. All this art is made by an gentleman by the name of Ichiyoh Haga. None of his art work had a price tag on it (or at least I could not see it!) so I assumed that it would be beyond the buying capacity of a common girl like me. And of course I did not have the courage ask ;) See this miniature shop. Doesn't it look life size? Don't be fooled. Scroll down to the next picture to compare the actual sizes of his work compared with a smart phone.

See? How tiny and detailed is that!

You can visit Ichiyoh Haga's website here.
My husband thinks I should put up my own jewelry stall at Design Festa next year! Who knows, maybe I will. Take a look at my online store if you are interested and tell me what you think.
Ok, I've done my good deed (blog post) for the week. See you all soon. Send me your comments! And, don't forget to Subscribe to this blog!
Ciao
Pretty up that planter base!


So I set about my project. First step, scrub the dirt off.

Next, I used Black Liquitex Gesso to cover it completely with 2 coats and allowed it to dry.


Next, I used the back of a pencil dipped in neon acrylic paint to randomly stamp polka dots all around.

And is is what the final piece looks like under my neon green pot..
I love how it turned out!

The Video
Hope you enjoyed this post! If you like what I share, don't forget to Subscribe to this blog.
Have you ever tried covering your storage containers in fabric?

And now let me show you the BEFORE.. (Did I tell you how much I love before-afters?!) Actually, this box once contained my son's fork lift remote control kit and I was just reusing it to store some of my beads...

I decided to use two pieces of contrasting fabric to cover my box. Half would be green (with black spirals) and the other half would be black (with white polka dots). I used Tombow's Pit Hi-Power Adhesive glue stick for most of my sticking. It works just great with fabric!
So here is what I did..

First I cut out my 2 pieces of cloth and stuck them half-n-half on the cover of my box. I did not worry too much about straightness of the edges because I was planning to hide them with a neat trick.

Next, I found 2 different types of lace - one frilly white and one black (with sequins) and stuck them one on top of the other, exactly where the join of the two fabrics was.

I then used two brads to secure a label holder on one side of the box. I used my Brother P-Touch label maker to type out my label and stick it first to a small piece of fabric left over from the other half and then slid it into the label holder.
Look! I am done....

This is what my box looks like from the top. I love it and hope you enjoyed my project as much as I did!
Spring Fabric Haul - Why not?
So I wanted to achieve a certain look around my work space using color combinations and patterns that I have been noticing recently in interior design mags and websites. I decided to visit Yuzawaya (ユザワヤ), one of our fairly large craft/fabric stores (which happened to be on sale yesterday). Unfortunately, we don't get a lot of modern prints and colors in Japan so I went to the store with mixed expectations. I had to REALLY look hard! For example, I did not find a single chevron print in the entire shop! I know, right? But for whatever it's worth I was quite pleased with my haul, especially because it fits in with the look I was after.
Here is the first set with Green and Black. This is a really "in" combo right now, especially because we are in spring, but even otherwise.. Notice how I went crazy over Black 'n' White polka dots in three different sizes! My favourite one though is the spring green with black spirals.


Here is the first set with Green and Black. This is a really "in" combo right now, especially because we are in spring, but even otherwise.. Notice how I went crazy over Black 'n' White polka dots in three different sizes! My favourite one though is the spring green with black spirals.
And here is the other combo I really love with Teal and Dark Brown. Just makes me want to smile...
I am still not sure exactly how I am going to use these, but I imagine covering some of my files and storage containers with these fabrics. Or maybe I will come up with an entirely different use for them. Who knows?! Will definitely post pics when I have something to show you!
Also, I would love to here about your favorite color combinations and pattern.. Leave me a comment!
See you soon.
Really? Decorative Painted Stones?
I know, right? Who would have thought painting stones could be so cool!!! As always, I promptly created a Pinterest board called "Painted Stones" to capture all the creativity around this cool craft. Check out my board here for more ideas you could try.

Here's a step by step on how I made these adorable painted beauties for literally nothing!
1. Visited my garden, picked some nice smooth (that's the key) stone shapes. Grabbed some acrylics lying around, painted some very basic stripey shapes on half the stone (kind of my style because I still want some of the original stone texture to show)


Next, I grabbed some black and white Posca/sharpie pens (or equivalent will do) and painted some grassy looking lines and circles on top (yeah, it's as easy as that). Filled in the circles with a contrasting color and I was done.


Here is what my final project looks like. I love how it turned out. As an additional step, I might trying varnishing the stones for some waterproofing.

Hope you enjoyed this post! If you like what I share, don't forget to Subscribe to this blog.
Try making your own decorative binder clips!

Here's a closeup on my washi tape. I am just loving this pretty combination of colors. Can't wait to try it on another craft!

I tried another one with a smaller binder clip size and a different washi tape. I love the way it turned out. Maybe I will add some bling to it as well. (Note to self: Remember to visit the craft store...) Plus, I am going to make another set, but this time I will first paint the clip white (with Gesso) and then stick on the washi tape so that the colors pop out even more.


Ok, so I added some bling later and I like what I got!!!

Hope you enjoyed this post! If you like what I share, don't forget to Subscribe to this blog.
Subscribe to:
Posts (Atom)